
This article provides an overview on how to create Sponsored Brands (SB) in Ad Optimizer.
Go to https://ad-optimizer.metoda.com/
For the onboarding of Sponsord Brands, click "Campaigns". This leads you to the campaigns section.

You can either:
-
Case 1: add SB campaigns for new products manually by clicking “New campaign” or

-
Case 2: import several new campaigns at once using “Import” and our onboarding template (the Excel template can be downloaded by clicking "Import", "Download example Excel")

In both cases, you need to fill in all mandatory information:
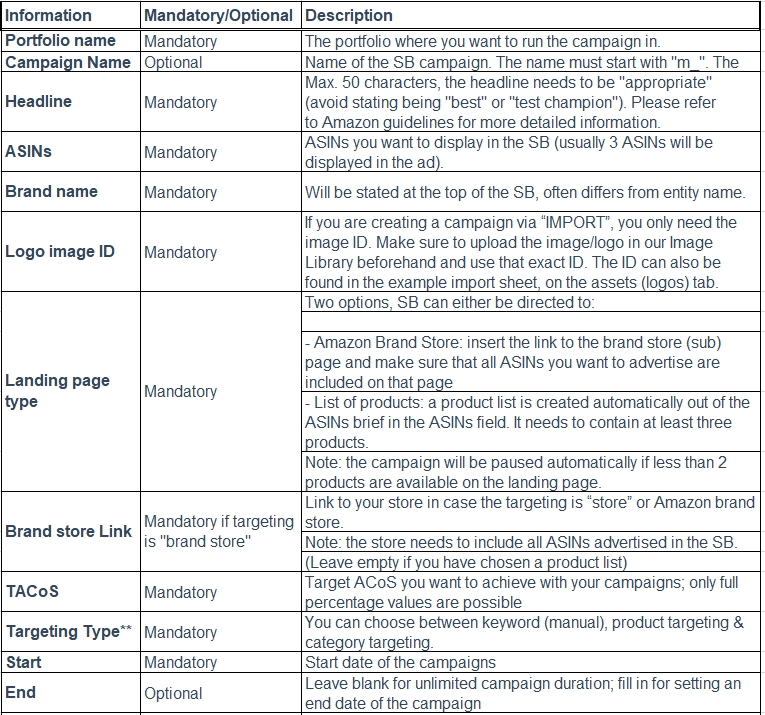
*According to our best practice, the keywords will be integrated with phrase as match type. The ads can be shown according to the phrase and close variations of it. This allows us to reach a lot of customers, while still keeping the targeting of shoppers precise.
** There are three Targeting Types for Sponsored Brands:
-
Keyword: we include suitable keywords from our database and optimize them automatically. Additionally, well-working keywords from the auto campaigns will be added continuously.
-
Product: Select ASINs on whose product pages the SBs should be displayed.
-
Category: With category targeting feature, you can target your own product categories and brands on Amazon.
Case 1: Generation of new campaigns using "New campaign" leads you to the following screen
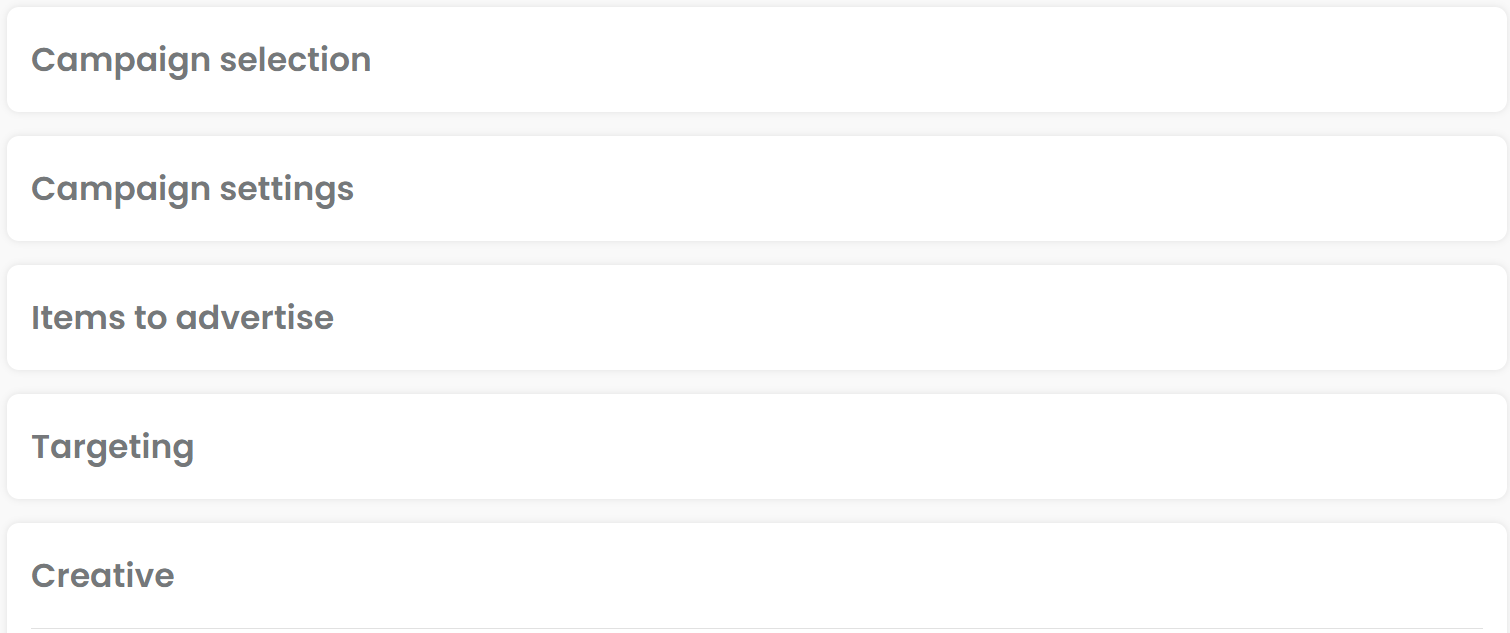
There are 5 major steps you need to complete one by one to set up your campaign. Once you filled in all mandatory fields you will be directed to the Launchpad where you can make some last adjustments before creating the campaign(s).
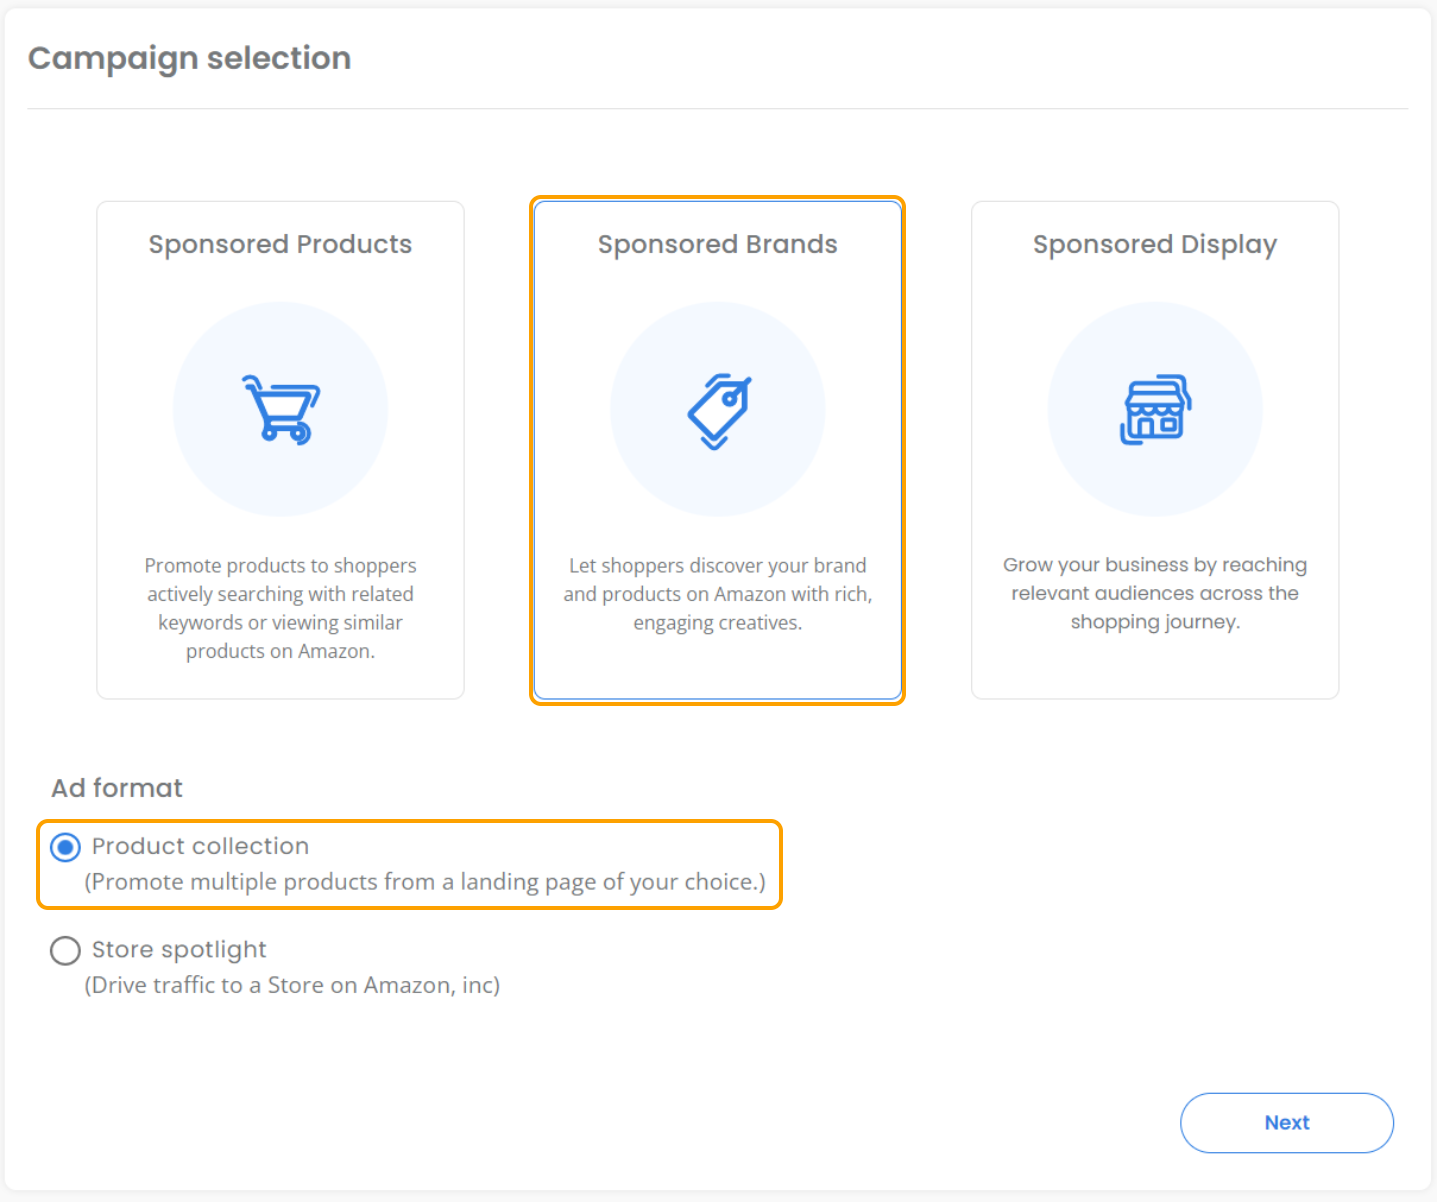
Step 1: Campaign selection
Select Sponsored Brands.
Choose for the ad format product collection
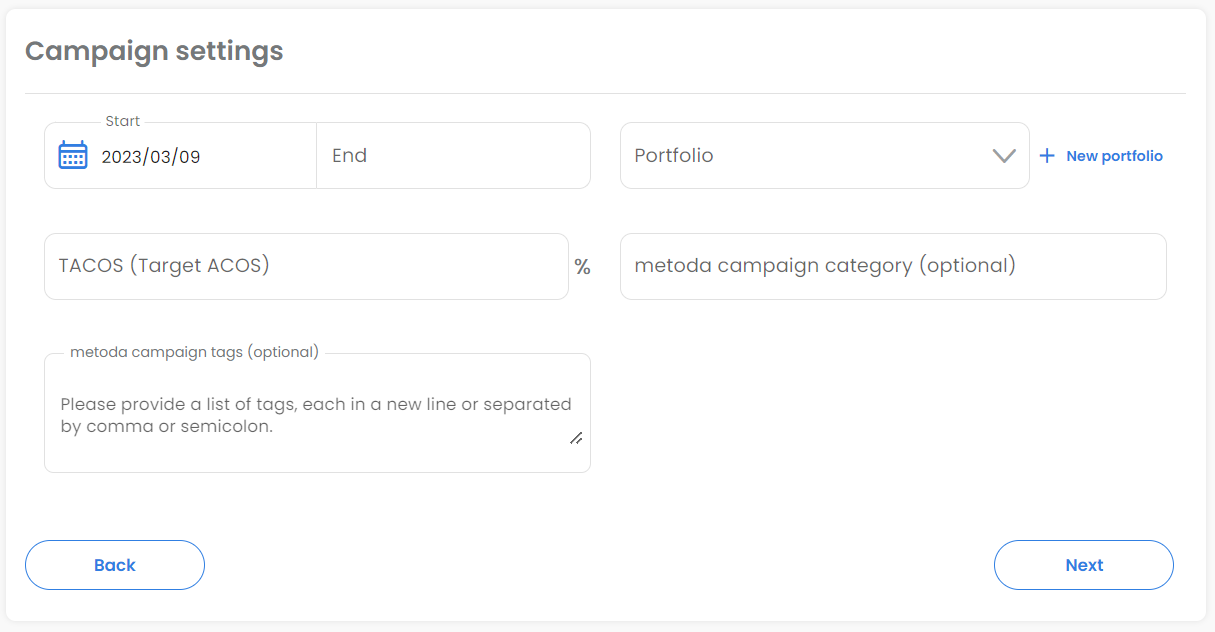
Step 2: Campaign settings
-
Define the start date (end date optionally)
-
Select the right portfolio (use the drop-down list to select an existing portfolio or create a new portfolio via "+ New portfolio")
-
Set a TACOS
-
optional - Choose a metoda campaign category (the existing categories are displayed in the selection list after entering. Select one of them or create a new category)
-
optional - Choose one or several metoda campaign tags
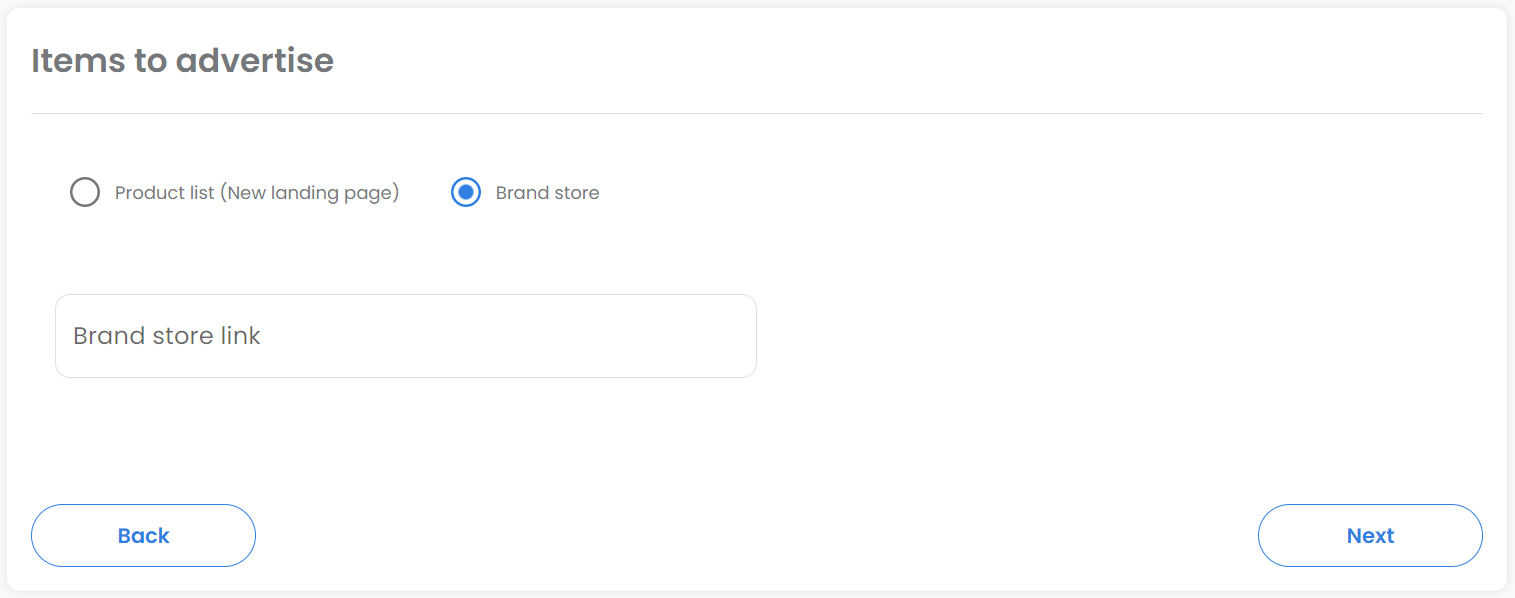
Step 3: Items to advertise
Step 3.1: Product list
Enter the ASIN(s) of the product(s) you want to advertise.

Step 3.2: Brand Store
Add the Brand store link
Step 4: Targeting

Step 4.1: Keyword (manual)
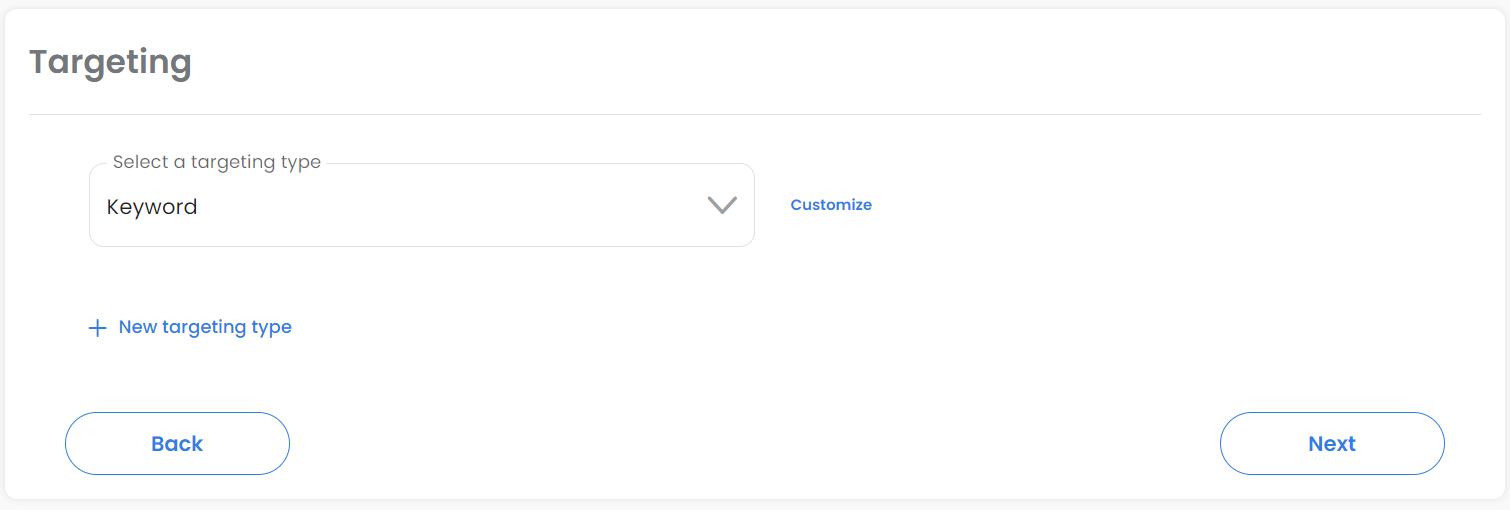
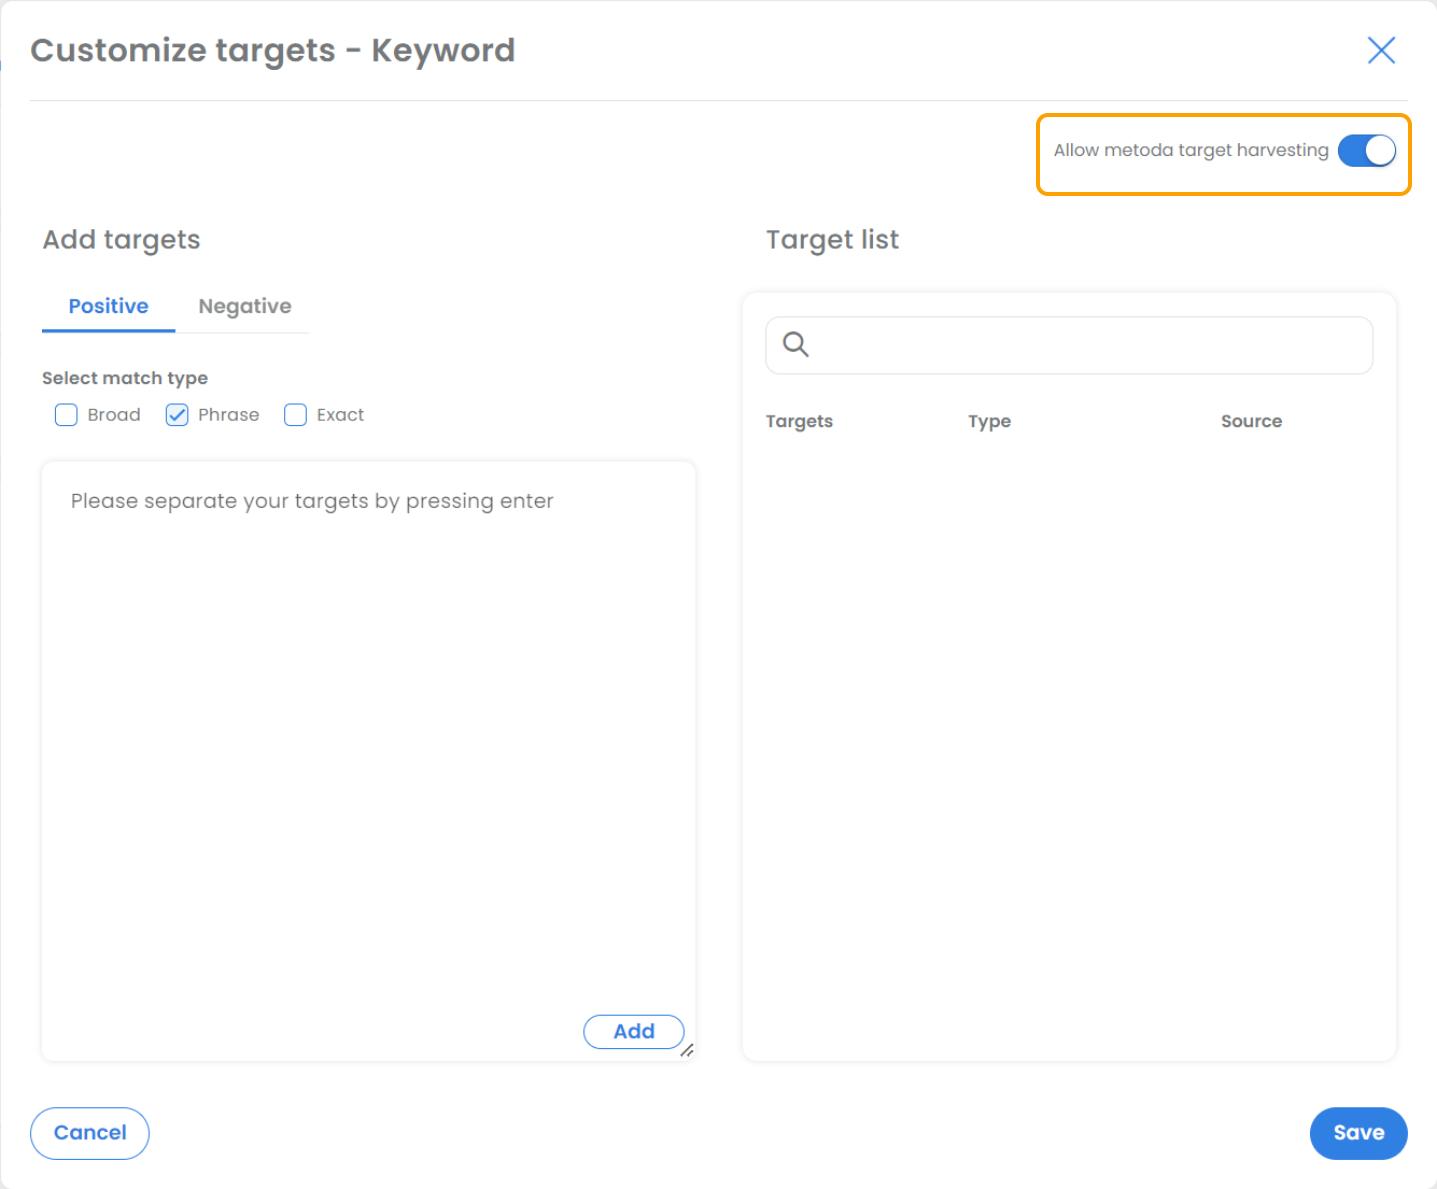
Click on "Customize" to add positive or negative keywords.
"Allow metoda target harvesting": Please make sure that you have added manual targets, if you deactivate "metoda target harvesting". Otherwise, the campaign will be "incomplete" and cannot be shown.
-
Important note: If you disable automatic target harvesting after creation, the targets already added by the system will remain. However, no new targets will be added by our target harvesting logic.

Step 4.2: Product targeting

Click on "Customize" to add target ASINs, whenever necessary from a strategic point of view:


Basically, in terms of targeting strategy, we differentiate between the following tactics:
-
Defend strategy: use product targeting and defend your own ASINs with your own ASINs (e.g. for cross-selling or up-selling purposes). With this tactic, we try to protect your own product detail pages from competitors.
-
Narrow attack strategy: use product targeting and attack relevant competitor products (e.g. close substitutes of your products, complementary products). With this tactic, we try to steal traffic from relevant competitor product detail pages.
-
Broad attack strategy: use category targeting in order to attack all other products in the same category. This is a very broad approach but does not require as much research from your side.
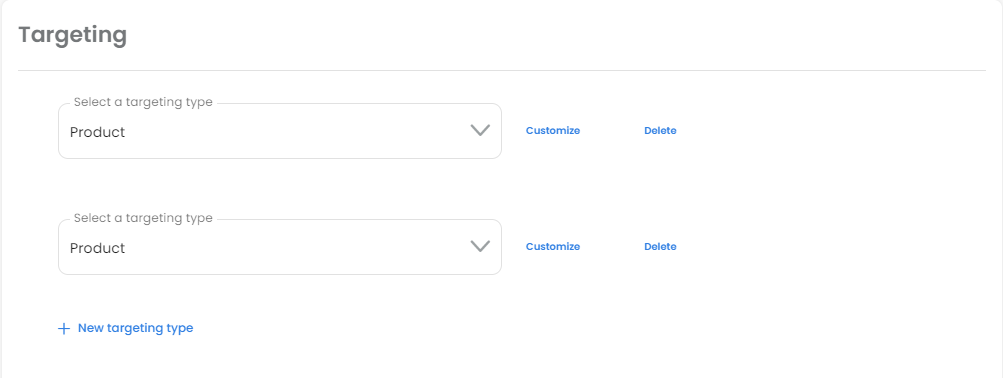
It is possible to set up the same targeting type multiple times. In the case of product targeting, this could be useful for defend and attack campaigns, for example.
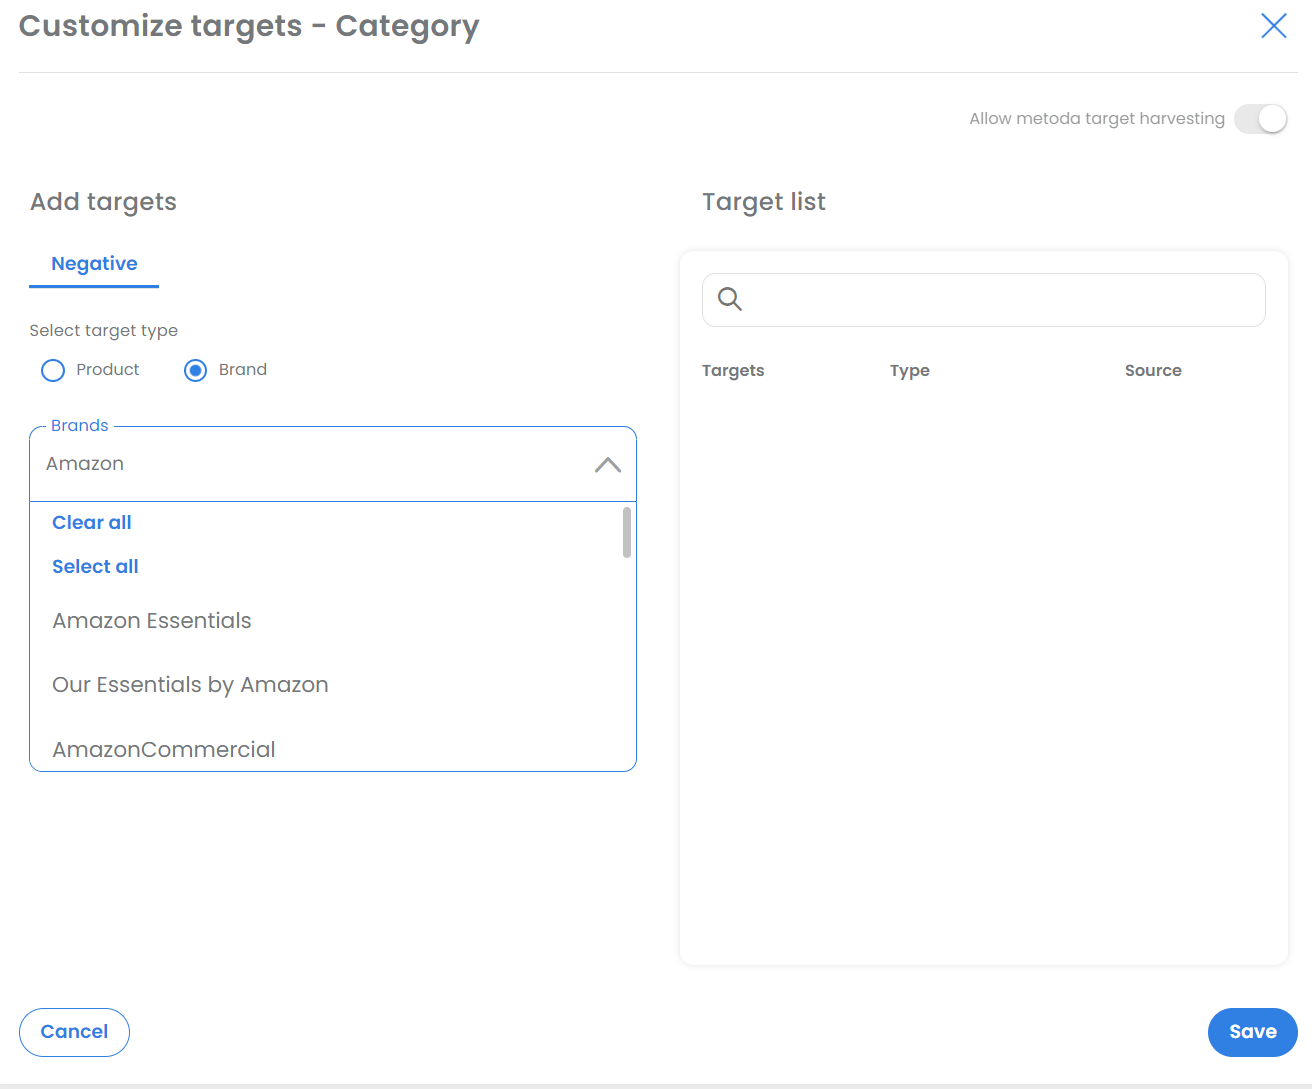
Step 4.3: Category targeting
Select "Category" in the drop-down

For category targeting, Ad Optimizer automatically uses Amazon's suggested categories.
Click on "Customize" to add negative targets
It is possible to set brands negatively. To do this, enter the brand name and select it from the drop-down list. It is also possible to set products negative. To do this, enter the ASINs.
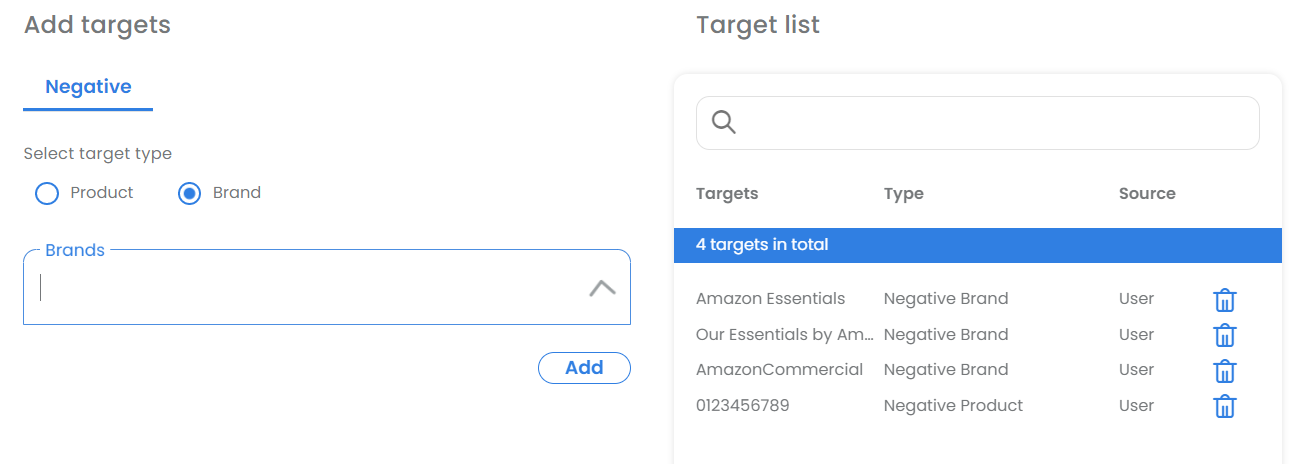
Negative targets added
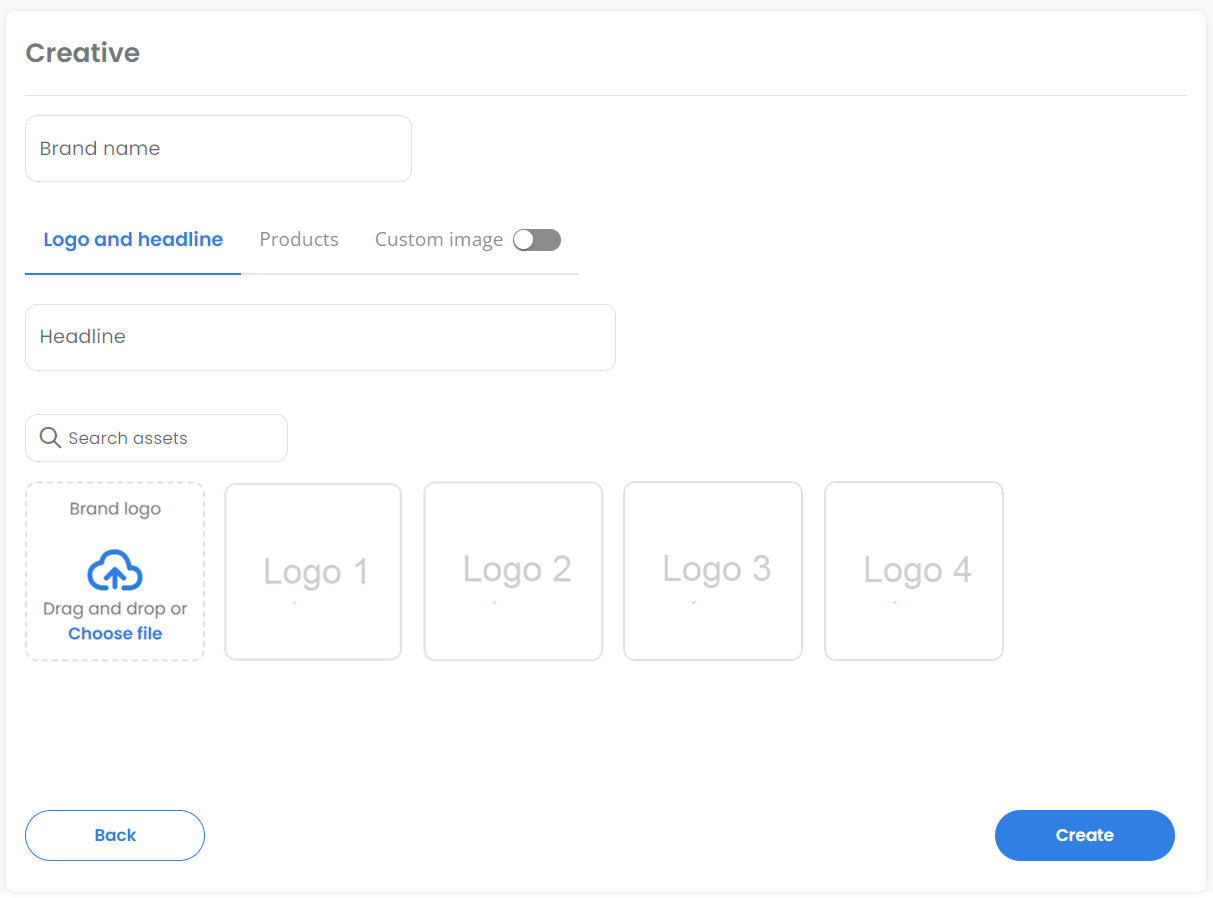
Step 5: Creative
Select a Brand:

Step 5.1: Logo and headline
-
Choose a brand name
-
Add a headline (max. 50 characters).
-
Select a logo or upload a new one.
-
Logo Specs:
-
Image size: 400 x 400 px or larger
-
File size: 1 MB or smaller
-
File format: PNG or JPG
-
Content: Logo must fill the image or have a white or transparent background
-
Step 5.2: Products
Here you can manage the ASINs.
-
For the product list, the ASINs from step 3.1 will be added automatically.
If a brand store was selected in step 3, three ASINs must be added, which are available on the respective brand store page.

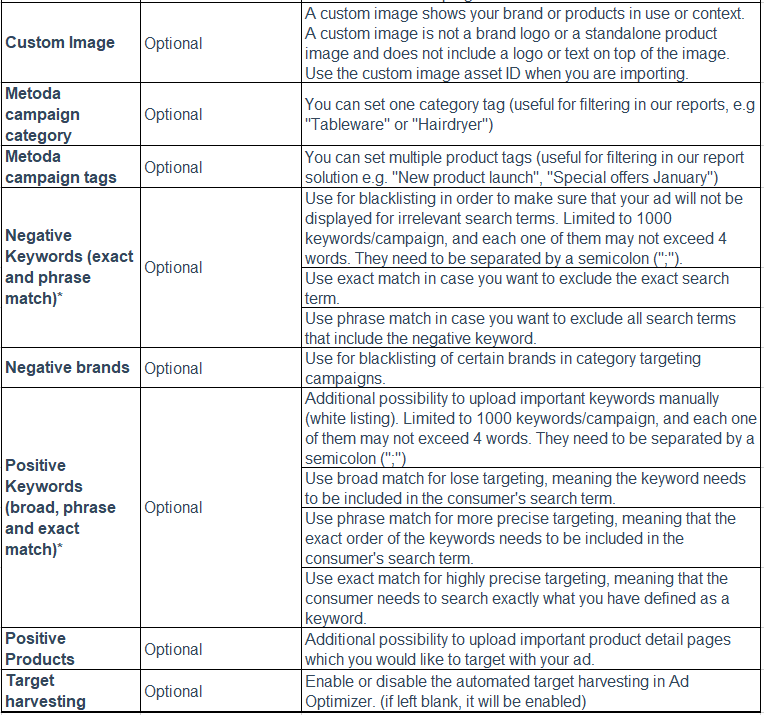
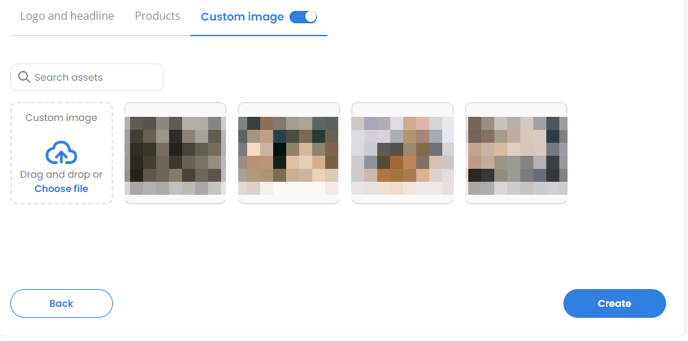
Step 5.3: Custom Image
Enable Custom Image and select a Custom Image from your assets or upload a new one:
-
Image Requirements:
- Minimum size: 1200 x 628 pixels
- Formats supported: Square (1:1), Horizontal (1.91:1), and Vertical (9:16)
- Maximum file size: 5 MB
- Accepted formats: PNG or JPG
- Content restrictions: No text, graphics, or logos
-
AdOptimizer Functionality:
- Automatically uses all three formats for your creative.
- Use the "Replace custom image" menu to replace images for each format individually.
- You can use up to three different images per creative.


- Slideshow Creatives for SB (Product Collection) Ads:
- Available during both creation and updates.
- Allows you to add up to five custom images per campaign, presented as a slideshow in the ad.
 When everything is set, click on "Create" and the campaign will be created.
It is always possible to go back to the individual steps and change something there.
If everything has worked, the following message will appear. Then refresh the page to see the created campaigns in AdOptimizer.

If something didn't work, you can download an Excel with the error report, make adjustments, and re-upload the file.
IMPORTANT NOTE: Sponsored Brands are moderated by Amazon. They might be rejected in case they are not policy compliant. Please check the campaign one day after creation, and adapt it in case of rejection.
Setting a budget period is the necessary requirement for your campaigns to be displayed. Only if a budget period for the selected portfolio exists, will your campaigns be running.
-
Set a budget: make sure to set a budget in Ad Optimizer (ideally within separated/dedicated portfolios, e.g. "m_sb"). The Ad Optimizer will take over the budget management. Setting a budget period in the respective portfolio is the necessary requirement for your campaigns to be delivering. Otherwise, the campaign does not have any budget to be spent and will be paused accordingly.
Case 2: import several new campaigns at once using “Import” and our onboarding template (the Excel template can be downloaded by clicking "Import", "Download example Excel")
Step 1: Download the example Excel and fill in all mandatory information.

Open the "SB (product collection)" spreadsheet.

The Excel template has instructions on how to fill in the cells.
-
Campaign name: Will be automatically defined by Ad Optimizer, or will use your input right away if the field is filled.
-
TACOS: Target ACoS is 15% by default
Step 2: Save the Excel and drag it into the "Import campaigns" screen.

Choose the "Campaigns" upload as well as the matching import settings.
If the bulk template contains numerous targets/keywords, consider selecting "Remove invalid targets/keywords and only add valid ones." However, for a more cautious approach, opt for "Refuse creation/update and provide issue report" to ensure any potential issues with the campaigns are identified and not overlooked or left uncreated.
Download error report if it fails
In case something is not filled in properly, you will receive error messages in a Excel report, indicating in which row adjustments are necessary (Column U). This is only possible, if you choose "Refuse creation/update and provide issue report".
Common mistakes: e.g. not all mandatory fields were filled, start date in the past, wrong formatting of the cells. Please read the instructions in the template carefully and follow the guidelines.
Do not add or delete any columns or change the order of the columns!